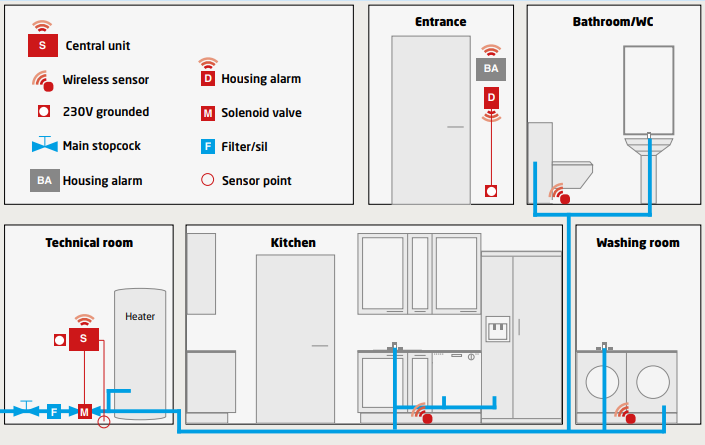
Principle sketch
Included components
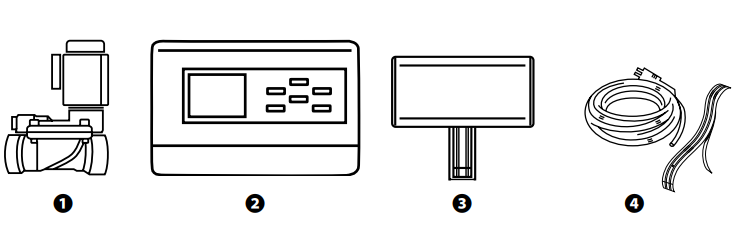
1. Solenoid valve
Danfoss solenoid valve - 1/2" and 3/4" dimensions
2. Central unit
Powers the solenoid valve(s) and receives signals from the sensors. Has a power outlet for dishwashers, etc. In case of the water leak the power is cut.
3. Wireless sensors
Two sensors to be placed where risk of water leak is present.
4. Sensor cable and sensor tape
4 meters of sensor cable is cut to desired length and pulled from the central unit. 3 meters of sensor tape to extend the sensor range.
About SMART BASIC
Waterguard Smart Basic is a highly advanced wireless system. Best used in homes and commercial buildings where several rooms need to be monitored. The system can be upgraded with the necessary number of sensors. With optional valve and pressure sensor Smart Basic can be used for pressure testing the pipes to detect hidden leaks. The system is also ready for connection to alarm systems.
Installation instruction
Solenoid valve
1. The solenoid valve is preferably mounted on the cold water intake after the main stopcock. If a fire hose is installed, the solenoid valve MUST be installed after the hose.
2. The solenoid valve can be installed horizontally or vertically. When installed horizontally, the electric coil must never face downwards.
3. The solenoid valve must be installed in the direction of the water flow, see arrow on the housing.
4. Plug the power cable into the solenoid valve, use the included rubber gasket between the outlet and the valve. Fasten with the included screw.
NB: The filter MUST be installed if water can be contaminated by dirt or particles.
Central unit
1. Mount the central unit on the wall close to the solenoid valve.
2. Connect the solenoid valve cable.
3. Fasten the sensor cable and pull it to the area to be monitored. Remaining areas are monitored with the wireless sensors.
4. Plug into a 230V grounded socket.
NB: The system must always be tested after installation. Moisten all sensors with a wet cloth and check that the valves close. Push RESET on the control panel to open the valves again. The system should be tested twice a year by the user.
Pairing wireless sensors
1. Make sure that the control panel and the sensors is in short distance.
2. Insert the two AA batteries (included) in the sensor(s) by tilting off the lid.
3. Now activate the sensor by pushing the small button located close to the batteries in the sensor. The pairing between the central unit and the sensor is sow activated, with the sensor registered with the selected area.
Comments
0 comments
Please sign in to leave a comment.